GeneticsLab for iOS Support
This guide will show you how to perform the most common tasks in GeneticsLab. Please, select one of the help topics on the list to begin. We hope you enjoy GeneticsLab!
Welcome to GeneticsLab
This documentation site will help you get started with the basic GeneticsLab for iOS workflow. Select one of the help topics on the list to display the associated help content.
Other learning resources
We're planning to add more documentation regarding the genetic code and some of the basic principles of molecular biology in the future. Meanwhile, here you have a few links to some resources that can be useful for you if you have any doubt related to these concepts:
- DNA and RNA on Wikipedia
- Transcription and translation processes on Wikipedia
- Genetic code on Wikipedia
Documentation is also available in other languages:
![]()
![]()
![]()
The workspace view
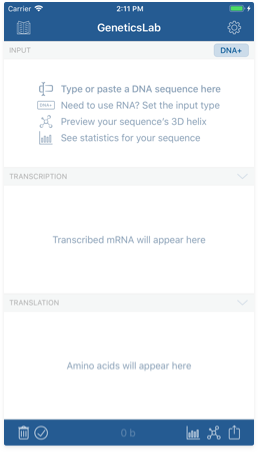
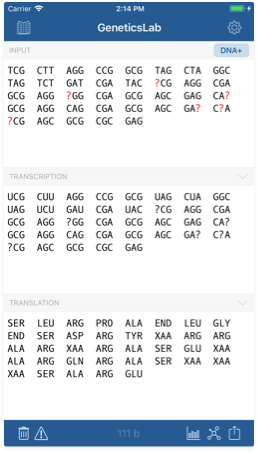
The editor view is the first screen you see when you've just opened the app. Here is where you can work with your DNA or RNA sequences, which you can type or paste in the input field. When the text on the input field changes, GeneticsLab does 4 things:
- Automatically formats your sequence to display as triplets or another style of your choice. See 'Settings' for more details on this.
- Invalid characters are colored in red. They are ignored in further processing. You may also see blue-colored characters representing extended symbols. See 'Settings' for more details on this.
- Updates the base count indicator to show you how many symbols you've already got.
- Generates the RNA transcription and amino acid translation corresponding to your input sequence.
Interface elements
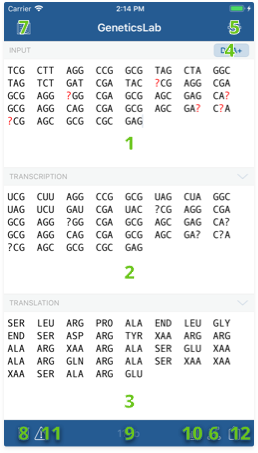
- Input sequence field: Here is where you can type or paste your sequence.
- Output RNA sequence field: Transcribed RNA will show up here, according to your input mode.
- Output amino acid sequence field: Amino acids translated from the output RNA will show up here.
- Input mode indicator: Its text indicates which input mode is being used to parse your sequence. Tap on it to display a list of possible input modes.
- Settings button: Tap this button to access app settings screen and customize your experience.
- 3D model button: This button triggers the creation of a 3D helix model of your sequence.
- Reference library button: This button displays the reference library.
- Discard document button: Use this button to clear the contents of the input field.
- Symbol count indicator: This label will show you how many nucleotides are in your sequence.
- Statistics button: This button displays the statistics screen.
- Issues button: This button displays the issues screen.
- Share button: Use this button to print or share your sequence via mail, social networks or any other apps installed on your iOS device.
Available input modes
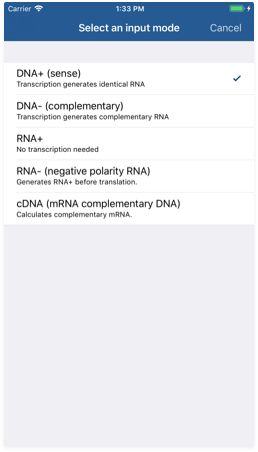
- DNA+: This is the default mode. It assumes your input is the sense DNA string, so output RNA will be generated directly. In this mode, typed U characters are interpreted as T.
- DNA-: This mode assumes your input is the complementary DNA string, so output RNA will be generated from a complementary string. In this mode, typed U characters are interpreted as T.
- RNA+: This mode assumes your input is the RNA string, so no processing is done here. In this mode, typed T characters are interpreted as U.
- RNA-: This mode assumes your input is the complementary RNA string, so output RNA will be generated from a complementary string. In this mode, typed T characters are interpreted as U.
- cDNA: This mode assumes your input is a DNA-complementary version of the mRNA string that will be generated, so it behaves just like the DNA- mode.
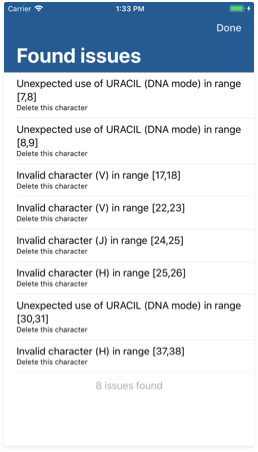
The issue inspector
Detecting and solving common errors in DNA, RNA and amino acid sequences is one of the most powerful GeneticsLab features. You may reach the issue inspector by tapping the second button from the bottom right corner on the Workspace view. By the moment, the analyzer can detect and solve three kinds of issues:
- Invalid input characters. This includes any character not being an A, C, G, T, U or any of the extended genetic code characters if its use is allowed.
- Ambiguous amino acid generation. This happens when a parsed codon does not have enough information to code for a concrete amino acid. Note that some codons may still translate into an amino acid if their third base is not set to A, C, G or T; since the genetic code actually is degenerated. However, being too unspecific might lead to an ambiguous translation.
Fixing issues
Sequence statistics
The sequence statistics screen allows you to get information about the different symbol proportions in your sequence. You may reach the issue inspector by tapping the third button from the bottom right corner on the Workspace view.
Each row shows the symbol proportions both in absolute and percentage units.
Go back to top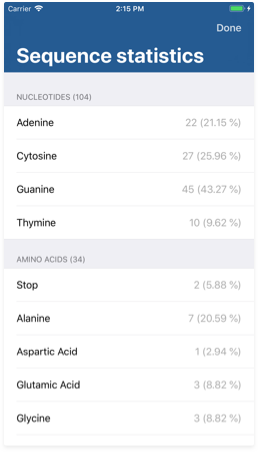
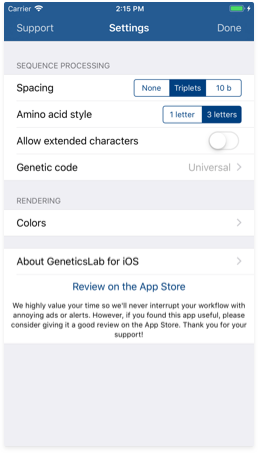
Sequence processing settings
The settings screen allows you to customize the way your input sequences are formatted and processed. You may reach the settings pane by tapping the button on the top right corner in the Workspace view.
Here are some of the customizable elements:
- Spacing: Use this control to customize how the input sequences are formatted. Here is the same sequence using the 3 different spacing modes:
- None
ATGATGATGATGATGATGATGATGATGGGTGATGCTGATCGATCGTAGGATACC - Triplets (default)
ATG ATG ATG ATG ATG ATG ATG ATG ATG GGT GAT GCT GAT CGA TCG TAG GAT ACC - 10 b
ATGATGATGA TGATGATGAT GATGATGGGT GATGCTGATC GATCGTAGGA TACC
- None
- Amino acid style: Use this control to customize how the amino acid sequences are displayed. Here is the same sequence using the 2 different styles:
- 1 letter
MGLVALPQRVTTIYEVSHF|MHGFEGG| - 3 letters (default)
Met Gly Leu Val Ala Leu Pro Gln Arg Val Thr Thr Ile Tyr Glu Val Ser His Phe END Met His Gly Phe Glu Gly Gly END
- 1 letter
- Allow extended characters: You can use this switch to enable or disable parsing of extended character from the genetic code. Yoy may find more information about these characters in the table on this page. When disabled, extended characters are handled as invalid characters. Please note that using these characters incorrectly may lead to ambiguous translation results.
- Genetic code: The universal genetic code should be enough for most users. However, if you need to use an alternative genetic code such as the vertebrate mitochondrial code, you may use this control to switch between the different rules.
| Extended character meanings | |
|---|---|
| B | Not A |
| D | Not C |
| H | Not G |
| K | Keto |
| M | Amino |
| N | Any base |
| R | Purine |
| S | Strong |
| V | Not T/U |
| W | Weak |
| Y | Pyrimidine |
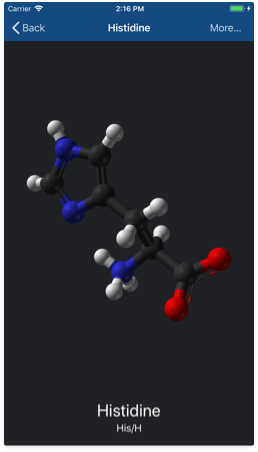
The reference library
If you're a beginner or you don't remember something about a concrete nucleotide or an amino acid, the reference library might be a quick and useful reference tool. You may launch the reference library by tapping the 'Reference library' button (the 2nd from the bottom left corner) in the 'Workspace' view.
This will bring up a list of the 20 common amino acid molecules. You may also switch to a list of nucleotides by tapping on the segmented control place at the top. From here, if you tap on any molecule on the list, you'll be redirected to a detailed page, where you will have:
- A 2D representation of the selected molecule.
- The full name of this molecule in your language, as so as its standard abbreviated names.
- The 'More...' button. Tap it to check out the article corresponding to the selected molecule in Wikipedia.
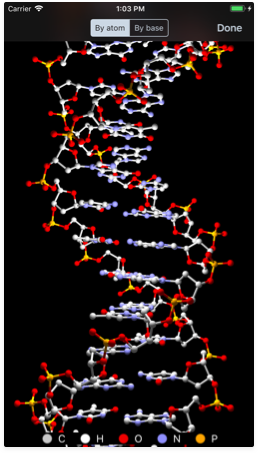
Creating 3D models
Learning visually is better and now you can now experiment with a stunning 3D model of your sequence. Just tap the molecule button near the bottom right corner and GeneticsLab will generate a 3D representation of the helix structure. This works for both DNA and RNA.
Once the helix for your sequence is generated, you'll see how it begins spinning automatically. To stop the animation, just tap anywhere.
Experiment
Not only can you generate a 3D model of your sequence. You can move it, rotate it and zoom into it to discover every detail. The available gestures are:
- Pinch to zoom in or out the molecule.
- Rotate two fingers to rotate the molecule.
- Slide with one finger to move the camera around the molecule.
- Slide with two fingers to move the molecule around the screen.
Different color schemes are also available, including:
- By atom: colors each atom according to their element in the periodic table.
- By base: colors each atom according to the nitrogenous base they belong to.
Customize
You can customize the default color strategy or even individual colors in the settings screen. See '3D settings' for more details on this.
Go back to top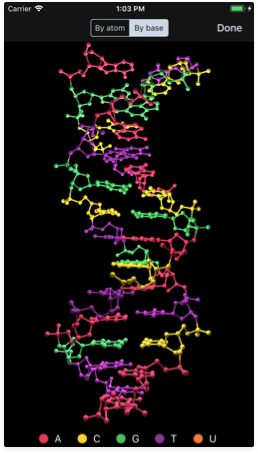
3D model color settings
The settings screen allows you to customize the way 3D model generation works. You may reach the settings pane by tapping the button on the top right corner in the Workspace view. Then go to the colors section tapping the 'Colors' button.
Default colors
Default values for the 'By atom' color scheme are the following. For the moment, these cannot be changed in the settings screen.
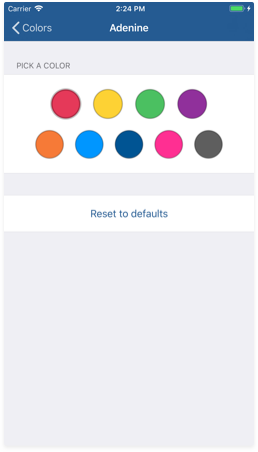
For the 'By base' color scheme, you can change each nitrogenous base's color using the color picker. Customize the colors as you want and then test them using the 3D tool.
Use the 'Reset' button to restore all settings to their default values, which are:
Prefered color mode
You can choose the default color scheme for 3D model generation from this section. This will only affect the initial color strategy when you tap the 3D button, you will be able to switch between the two modes at any time.
Go back to top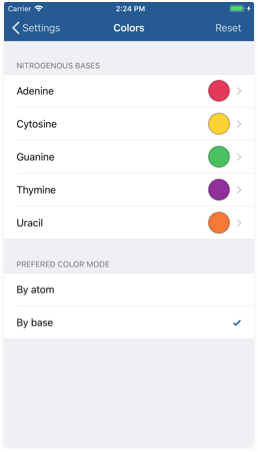
Still have questions?
If you have any questions, complaints or suggestions, please do not hesitate to contact me.